Hiển thị các bài đăng có nhãn tipandtrick. Hiển thị tất cả bài đăng

Thứ Ba, 31 tháng 12, 2013

How to Download Windows 8.x and Create a Bootable DVD / USB (Legally)

Over the years, readers have written in asking how to download Windows and make a bootable install disk, and we’ve always had to tell them that there isn’t a great way to do that. Microsoft has finally fixed this problem in Windows 8.x, and here is how to do it.
First you’ll want to go to the following URL and download the web installer:
Once you launch the executable, it is going to ask you for a product key. You do have one of those, right? I mean, we’re not helping anybody pirate a copy of Windows, after all.
Once you plug in the product key, it’ll show you the version of Windows that your product key is good for. Proceed to the next step.
You might notice that the background on our screenshots changed to blue. That’s because the awful default background for Windows 8.1 was getting on our nerves, and we just couldn’t take it anymore.
The setup program will download your copy of Windows 8 or 8.1, depending on which one you chose.
Now you’ll be asked if you want to install now, later, or create media. That’s the one we want to choose.
At this point, you can either choose to put the installer directly onto a USB drive, which will make a bootable version. Or you can choose to create an ISO file, which you can burn to a DVD. We recommend the bootable USB version.
Now that you’re all done, you might notice that there is a new folder called ESD in the root of your drive, and it is taking up 3 GB of space. You can remove this, but once you do, the installer will get weird and stop working.
So you can delete it if you want, but just know that the installer won’t work, and won’t re-download for some reason. We’ll look into it, but it’s not the most important thing.

Thứ Bảy, 14 tháng 12, 2013

How to Install Applications On a Mac: Everything You Need to Know

mac-applications-folder[4]
Installing software on a Mac is  different from installing software on Windows. There isn’t just one way to install applications on a Mac, either — there are several different ways, depending on the application you want to install.
New Mac users will likely find themselves asking a number of questions: Why isn’t every application on the Mac App Store? What is a DMG file, and why do I have to drag-and-drop the app’s icon after opening it?

Mac App Store

Recent versions of OS X include the Mac App Store, inspired by the iPhone and iPad App Store. Just open the App Store application included with your Mac and you can search for and install apps. Apps automatically update through here, just as they do on iPhone and iPad. For example, Apple’s iWork apps and even new versions of OS X arrive through the Mac App Store. Any apps you purchase from here are also tied to your Apple ID, so you can install them on your other Macs.
The Mac App Store sounds great, and can be very convenient. However, one of the first things you’ll probably learn as a new Mac user trying to install software is that not all the apps you want are available in the Mac App Store.
mac-app-store
RELATED ARTICLE
Sandboxes Explained: How They’re Already Protecting You and How to Sandbox Any Program
Sandboxing is an important security technique that isolates programs, preventing malicious or malfunctioning programs from damaging or snooping on the... [Read Article]
This can be for a variety of reasons. For example, the Mac App Store sandboxes apps distributed through it, placing limitations on them similar to the ones in place on iOS. This helps protect users, but makes certain types of software impossible. For example, the Twitter app is available through the Mac App Store — it doesn’t need to do anything too powerful. However, any sort of application that needs access to the entire file system wouldn’t be allowed in the Mac App Store.
Given the limitations, many developers still distribute their apps outside the Mac App Store.

DMG Files

Visit a Mac application’s website to directly download the application from the developer and you’ll probably get a DMG file. This is how Mac applications have traditionally been distributed.
A DMG file is a disk image, which is sort of like an archive file. When you download one, you can double-click it to “mount” it, allowing you to extract the application from inside it.
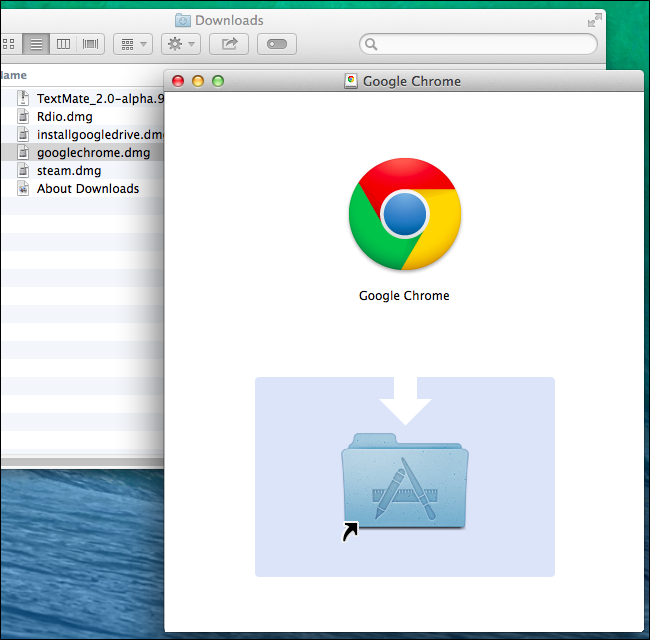
For example, let’s say you wanted to install Google Chrome on your Mac. You’d visit Google’s Chrome download page and download the file — it would be a DMG file. You’d then double-click the DMG file and a window would appear with the Application and a link to your Applications folder.
install-dmg-file
If you look closely, you’ll see that the DMG file is mounted under Devices in the finder. The window with the the application icon is basically just a Finder (file browser) window that contains several things — the application file (here, Google Chrome), a link to the Applications folder on your computer, and some sort of background image that tells you to drag and drop the icon.
Here, you’d simply drag the application icon to the Applications folder. This copies the application from inside the DMG file to the Applications folder on your computer. This doesn’t happen automatically because the DMG file is just a disk image; it doesn’t have permission to install an app on your computer. You must choose to do that yourself.
install-app-from-dmg-file
After the app is dragged to your Applications folder, you can run it normally — from the Finder, Launchpad, Spotlight, dock, or anything else. The first time you open a downloaded application, you’ll see a warning. Agree to open the file and you won’t see the warning again.
mac-application-downloaded-from-the-internet-warning
After the app is installed, you don’t need the DMG file anymore. You can “eject” the disk image by clicking the Eject button under Devices in the finder or Command-clicking its desktop icon and selecting Eject. You can then delete the DMG file by moving it to the Trash.
eject-dmg-file

Application Files

Some developers may not use DMG files. You may end up downloading an Application file itself. In this case, you can drag-and-drop the application file from your Downloads folder to the Applications folder. It will then be installed just like an app that was distributed in a DMG file.
You don’t actually have to install apps to your Applications folder. In fact, you can just place an app in any folder and double-click the application to launch it. Applications are traditionally stored in the Applications folder so they’re organized and located in a single place.
mac-drag-downloaded-application-to-applications-folder

Archives

Some apps are distributed in archive files with file extensions like .tar.gz or .tbz. To extract the archive file, simply double-click it. The Archive Utility will automatically extract the contents of the archive to the current folder.
You’ll then get an application file you can drag and drop to your Applications folder.
mac-extract-application-archive

Installers

Some applications, including Microsoft Office, have Windows-like installers. For example, if you want to install the Google Voice and Video plug-in so you can make calls from Gmail and participate in Google Hangouts, you’ll first need to open a DMG file and then double-click the installer, which is a PKG file.
The installer can do additional things that can’t be accomplished just with drag and drop, such as installing system services and placing files elsewhere on the system.
mac-install-pkg-file-installer

Gatekeeper

RELATED ARTICLE
HTG Explains: Do Non-Windows Platforms Like Mac, Android, iOS, and Linux Get Viruses?
Viruses and other types of malware seem largely confined to Windows in the real world. Even on a Windows 8... [Read Article]
When downloading an app from outside the Mac App Store, the app must be signed by an “identified developer” before it will run — at least by default. This helps protect average users from running a potentially malicious application. This application-signing feature is known as Gatekeeper.
You may run a downloaded application and see a warning saying the application “is damaged and shouldn’t be opened.” Your Mac will say “you should move it to the trash.” This is likely because the application wasn’t signed by its developer, but could also be because a signed application file was tampered with or corrupted during a download process.
mac-gatekeeper-damaged-move-to-trash
If you’re a normal Mac user and aren’t sure why you’re seeing this warning, you’ll probably want to stop here. However, if you know what you’re doing and need to run an application that you trust — but the developer hasn’t signed — you can disable this protection.
To disable Gatekeeper, open the System Preferences window — click the Apple icon at the top-left corner of your screen or click the System Preferences icon on your dock — and click the Security & Privacy icon. Click the lock icon, enter your password, and set the “Allow apps downloaded from” option to “Anywhere.” This will reduce your security as it allows unsigned apps to run, so be sure you know what you’re doing if you use this option.
mac-disable-gatekeeper

These different ways of installing software built up over time. The Mac App Store is new, and its limitations prevent it from being used for every Mac application. Gatekeeper has only been around for a few years, too. DMG files are a traditional way of distribution applications, but aren’t required. For some things, installer PKG files are required.

Thứ Sáu, 13 tháng 12, 2013

How to Securely Transfer Files to Someone Else with SFTP

We’ve previously written about hosting your own FTP server, but data is transferred in cleartext, making it unsuitable for confidential file transfers.  In this guide we’ll go over the secure version of FTP – SFTP, and why it makes for an excellent way of transferring files to other people across the internet.

Why SFTP?

Geeks run into this problem all the time: You have a file that’s just too big to transfer over email or instant messenger.  Sure, you could upload it to Dropbox or some other cloud service, but what if you don’t have/want an account with them, have enough storage freed up,  or what if you just want to bypass the middle man altogether? Not to mention the security concerns with cloud services.
Instead of going through that hassle, you can save time by transferring files (big and small) to your friend by using SFTP.  There’s no need to encrypt your files before transfer, because they are being tunneled through the very secure SSH protocol.  Not only that, but now you can upload directly to your friend instead of the cloud, saving lots of time.
But wait, there’s more!  If you want to share out more files with people, you can just drop them in a specified folder and your buddies can browse that section of your PC as if it were a part of their own.  Sharing files can be a whole lot easier with this method, because the uploading will be initiated by your friend instead of you.  All you have to do is drag and drop, and let them know they can now download the file(s).

Setting up SFTP

Setting up an SFTP server in Windows is going to require some third party software.  Most software that has this functionality is going to cost you, but we will be using a free one calledfreeFTPd.  Click that link to download and install the program.  Be forewarned, the developers clearly aren’t native English speakers, and it shows in a lot of the text.  Don’t be alarmed though, it’s a legitimate program that we’ve tested and everything checks out – you’ll be hard-pressed to find a better free alternative.
Go through installation as normal, and at the end there will two prompts, one asking if private keys should be created, and the other asking if it should run as a service; click Yes on both.
When installation finishes, open freeFTPd via the new shortcut icon on your desktop.  We ran into problems writing configuration changes, so make sure you right click on the icon and run the program as Administrator.
To get started with the configuration, click on Users to the left.
In this menu, click on Add and fill out the information for a new user account to access your server.
Under Authorization, you can choose to use “NT authentication” or “Password stored as SHA1 hash.”  NT authentication means that it uses a Windows username and password, so you’d need to create a new user on your computer for anyone who accesses the SFTP directory.  In most cases, it will probably be best to just store the password as a SHA1 hash and keep the SFTP user separate from the Windows users.
After you’ve typed in the desired username and password, uncheck the “FTP server” box towards the bottom and then click Apply.  Now that the user is setup, click on the SFTP tab.
The only thing really worth changing on this tab is the SFTP root directory.  This specifies where the files you want to share out will reside.  For simplicity, we’re just going to change the already populated directory to a folder on the desktop.
Once you’re ready to begin hosting files, click the Start button in this tab.  Windows Firewall will probably pop up and ask you if this is OK – click Allow access.
Now you should be able to return to the Status tab and see that your SFTP server is running.
Click on Apply & Save to keep these changes and then close the window.
freeFTPd will continue to run in the background.  To access it, just open it up from the notification area.

Accessing the SFTP Directory

Put a couple of files in your SFTP directory so we can do some testing.  If you left the home directory for the user at its default ($SERVERROOT\geek in our example), then you’ll need to create another directory within the SFTP root directory.
As you can see in this screenshot, we put two test files into the ‘geek’ directory which is inside of the ‘SFTP server files’ (SFTP root directory) folder.  Make sure that port 22 is forwarded to your PC on your router, and then you’re ready for someone to connect to your PC.  See this guide if you need help with port forwarding.
Have your buddy download an FTP client that is able to access SFTP servers – our recommendation is FileZilla. They will just need to type in your IP address, the username and password that you configured earlier, and specify the port your server is running on (if you left it at the default, it will be port 22).
The first time they connect to your server, they will be prompted to save the host keys.  They just need to check the “Always trust” box and click OK to never be prompted about this again (unless you change your host keys for some reason).
Your friend should now be able to access the files you placed within the SFTP directory, and add files to it that they would like to share with you.

How to Get Started With Speech Recognition on Windows 7 or 8

windows-8-speech-recognition
Did you know Windows has had Speech Recognition built-in since Windows Vista? This is more than just a way to type by speaking aloud — you can use it to control applications and navigate the desktop with your voice.
It’s a free, built-in alternative to paid voice dictation programs like Dragon NaturallySpeaking. It’s a shame most Windows users will likely never find it buried in the Control Panel.

Set Up Speech Recognition

To get started, open the Speech Recognition pane by launching the Control Panel, clicking Ease of Access, and clicking Speech Recognition.
First, ensure your microphone is connected to your computer. You can use a laptop or tablet’s built-in microphone, but you’ll get better results with a higher-quality headset or desktop microphone. Click the Start Speech Recognition option and Windows will walk you through setting up your microphone and getting started.
You’ll eventually be able to choose an activation mode. In manual activation mode, you’ll have to press a hotkey or click a button to start using Speech Recognition. In voice activation mode, you can simply turn it on by saying “start listening.”
A Speech Recognition bar will appear at the top of the screen when Speech Recognition is open, giving you information about what speech recognition is doing. If it doesn’t understand you or needs you to repeat something, it will ask you using this bar.

Train Speech Recognition

You’ll want to train speech recognition so it can better understand you. To do this, click the Train your computer to better understand you option in the Speech Recognition control panel. This isn’t mandatory, but some training will allow tehthe computer to better understand your voice.
This training feature is clever. It will have you read a speech recognition tutorial aloud, so both you and the computer will be learning at the same time. When you’re done, you should be ready to get started — but you can always do more training later. The speech recognition feature will also improve over time as it learns more about your voice.

Dictate Text With Speech Recognition

To dictate text with Speech Recognition, open any application with a text field and say “start listening” or click the microphone button if you selected manual activation mode. Start speaking and Windows Speech Recognition will enter the words you speak.  Bear in mind, that you will have to speak the punctuation marks you want to type.  For example, to type “Hi, how are you?  I’m doing well.” with the quotation marks, you’d have to say “open quote hi comma how are you question mark I’m doing well close quote.” .
Windows Speech Recognition won’t understand you perfectly, so you’ll have to correct it occasionally. For example, let’s say Windows misunderstands you and types the word “woman’s” when you say “moments.” To correct that, you’d say “correct women’s”. You’d see a panel appear on your screen with suggestions. To select a suggestion, say the number and then say OK. If you don’t see the word you meant to say in the list, say it aloud, say the number next to the appropriate word, and say OK. You can also say “correct that” to correct the last word you typed.
If you have multiple instances of a word in your document, you may need to narrow it down. For example, let’s say you have two “woman’s” in your document. When you say “correct woman’s,” you’ll see numbers appear over each instance of the word. Speak the number of the one you want to correct and say OK. For example, a correction may sound something like “correct woman’s two okay moments one okay.”
You can also say “correct” followed by multiple words to correct a phrase instead of correcting each word at a time.
Speech Recognition is extremely powerful for dictation and allows you to quickly make corrections, move the cursor around, and delete things. Once you learn the basic rules, the commands become fairly obvious and you shouldn’t have to regularly consult a cheat sheet. Here are a few of the many other voice commands you can use:
  • Delete previous sentence: Deletes the sentence to the left of the cursor.
  • Select word through word: Selects an entire range of words between the words “word” and “word.”
  • Go after word: Places the cursor after a specific word.

Navigate Your Computer With Speech Recognition

Speech Recognition isn’t just for dictation. You can also use it just to get around your computer, browse the web, and use both desktop and Windows 8-style applications. This works fairly well and uses a variety of commands that make sense. For example, saying “Start” will open your Start screen, while saying “Show Desktop” will take you to your desktop. You can also issue keyboard shortcuts by voice commands, so saying “press Windows C” will open the charms bar.
In most applications, you can say “show numbers” and a grid of numbers will appear over different interface elements. Say the name of the number and OK to select it.
Here are a few of the many shortcuts that will help you get around:
  • Open program: Open a program by saying its name. For example, “open Notepad” or “open Internet Explorer.”
  • Switch to program: Switch to on open program. For example, “switch to Notepad” will switch to the Notepad window if Notepad is open.
  • Close program: Close an open program. “Close Notepad” would then close the running Notepad window.
  • Minimize program, Maximize program, Restore program: These commands allow you to manipulate open windows, just as if you were clicking the buttons in their title bar.
  • Scroll direction: For example, you can say “scroll down” or “scroll left” to scroll in a direction. You can also define how far you want to scroll — for example,” scroll down five pages” or “scroll up one page.”
  • Press key: For example, “press Control C” is equivalent to pressing these two keys at the same time. You can say certain keys, such as “Delete,” “Backspace,” and “Enter,” without saying “press” first.
  • Click something: For example, saying “click File” is equivalent to clicking the File menu, and will open it. You can also just say something’s name to click it, such as “File.”
  • Double-click something, Right-click something: You can also double-click or right-click something by speaking “double-click” or “right-click” followed by its name.

Watch Videos and Play With It Yourself

This isn’t the kind of feature that you can learn about just by reading a text-based article. You should watch videos and see how it’s supposed to work in action and experiment with Speech Recognition on your own to learn more. You can also read about other Speech Recognition commands that we didn’t have room to cover here — there are many more.
For further information, be sure to watch these videos:
RELATED ARTICLE
The How-To Geek Video Guide to Using Windows 7 Speech Recognition
Ever get the desire to control your computer, Star Trek-style? With Windows 7’s Speech Recognition, it’s easier than you might think.[Read Article]

Windows Speech Recognition may not be up there with the paid voice navigation programs when it comes to understanding you as well as possible, but it’s surprisingly capable for a tool built into the operating system. Mobile platforms aren’t the only ones with built-in voice typing features.